Friday, August 29, 2008

Restoring Master and MSDB database in SQL Server

I don't need to mention the significance of Disaster Recovery (DR) plan for System and User Databases in SQL Server. I do test DR plan for User Database very often, but System Database generally I skip. In this post, I want to explain the DR plan and DR Plan testing for System databases. System database restoration is not as similar as User Database restoration. There are broadly three scenario where system database (Master and MSDB ) needs to be restored

(a) Master or MSDB to be restored from a earlier backup to undo the changes
(b) The Server machine crashed and sql server have been reinstalled with fresh copy.
(c) SQL Server is not starting because Master database corrupted
This scenario is well covered in this article


Proposed Backup Plan for System Databases

(a) Full Backup Daily
(b) If any major changes done like replication configuration or creation of Jobs take a backup of system databases after the configuration

You can either go for Hot Backup of Cold Backup of System databases. Hot backup is nothing but taking backup of system databases using BACKUP DATABASE T-SQL Command and you have to restore that backup using RESTORE DATABASE command. Hot backup is an online activity. Cold backup is stopping the SQL Server Engine , Copy MDF and LDF physical files to a backup location and Restart the service. Cold backup requires downtime and generally it is not the case in Production servers.


Scenario 1 : Restore Master & MSDB databases form the Backup file

I have full backup of Master and MSDB. My Master and MSDN databases got corrupted or i did some major changes and i want to rollback. Since i have backup i can restore the system database from the backup.

High level Steps

(a) Stop and Start the SQL Server Database Engine in Singe User Mode
(b) Restore the Master Database from SQLCMD prompt
(c) Start the SQL Server Database Engine
(d) Restore MSDB Database


Windows Start -- Run – Services.MSC --- Enter

You will get this window


Restore the Master Database from Command Prompt

Windows --- Start --- Run --- CMD --- Enter


-- If the Screen is not readable this is the command and the result

C:\>SQLCMD
1> RESTORE DATABASE MASTER FROM DISK='D:\MASTER_FULL.BAK' WITH REPLACE
2> GO
Processed 352 pages for database 'MASTER', file 'master' on file 1.
Processed 2 pages for database 'MASTER', file 'mastlog' on file 1.
The master database has been successfully restored. Shutting down SQL Server.
SQL Server is terminating this process.

C:\>


The message says that you have successfully restored Master database.

Note : You have to restart the Database Engine Now


Restore MSDB Database from Management Studio

RESTORE DATABASE MSDB FROM DISK='D:\MSDB_FULL.BAK' WITH REPLACE


Scenario 2 : Server Crashes – Reinstalled SQL Server Instance

In this scenario, the important point is , you must build the new installation to the same build from where the backup was taken. You have to have same OS Version Edition, Service pack ,Patches and You also must have SQL Server Version , Edition , Service Pack and Patches as the Earlier server from where the backup was taken. Once you build your server to the same configuration the process is same as mentioned in Scenario 1

Thursday, August 28, 2008

Configuring Linked Server from SQL Server to MySQL

Recently I got a project in which there was a Migration Task to be done from MYSql to SQL Server. Prior to this I never worked in MySQL and I thought it would be just simple as creating LinkedServer to mySQL and pull the data to SQL Server from SQL Server itself. So I decided to create linked server from SQL Server to My SQL and pull the data using OPENQuery Function. I tried to configure linked server in SQL Server and then realized that it is not simple as that. I had to lot of steps like download driver, install it , configure the provider etc. As usual I searched in net and found a thread which neatly mentioned the steps ( SQLServerCentral.com). This thread really solved my problem in hours. Of course the thread was good enough for an expert (indirect way of saying that am an expert ), but for a newbie it may be bit confusing. So I thought to make a comprehensive document which has all the step by step screen shots so that the process will be easier. Having said that, I am not taking any credit for this document, the whole credit goes to Jim Dillon who posted his solution in the above mentioned site.

Tested Environment :
Operating System : Windows XP, Windows 2000, Windows 2003
SQL Server : SQL Server 2005, (Note : I have not tested SQL Server 2000 but I feel it should work)
MySQL : MySQL Server 5.0
MySQL ODBC : ODBC 3.51

High level Steps

• Download and Install ODBC Driver from MYSQL Site
• Create ODBC DSN
• Create Linked Server in SQL Server
• Configure Provider
• Create linked server
• Enable OpenQuery in SQL Server instance
• Create Openquery script
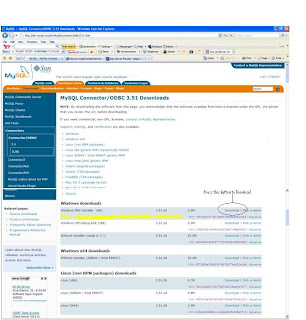
Step 1 : Download MySQL ODBC Connector
Download MySQL Connector/ODBC 3.51 from : http://dev.mysql.com/downloads/connector/odbc/3.51.html


Download the ODBC connector for your Operating System. I have windows xp , so I will download Windows MSI installer (x86)


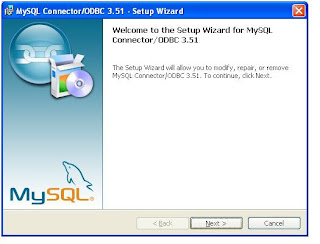
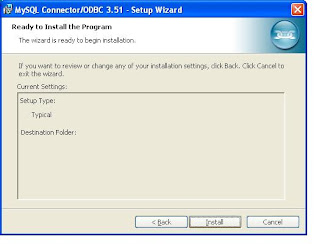
Step 2 : Install ODBC connector

Double click the downloaded file


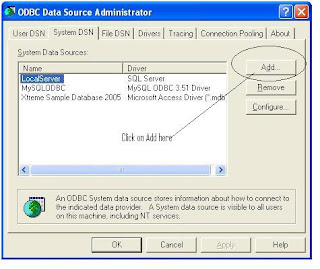
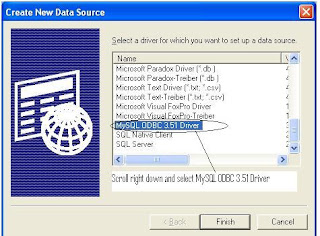
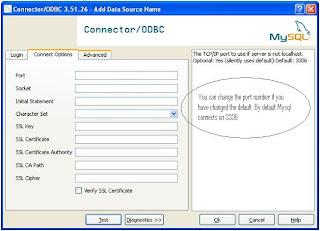
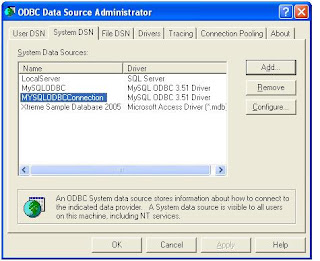
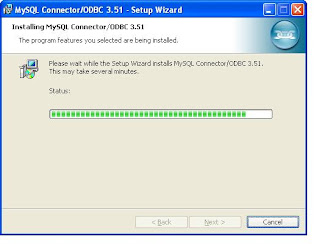
At last screen you will get a Finish button and click that. Now You have installed ODBC connector for MySQL.


Step 3 : Create System DSN for MYSql ODBC Driver

Windows Start --- >> Run --- >> odbcad32

Or

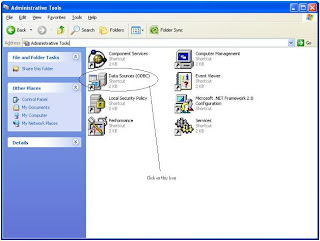
Windows Start --- >> Control Panel ->Performance and Maintenance (in XP) --- >> Administrative Tools -> Data Sources (ODBC)


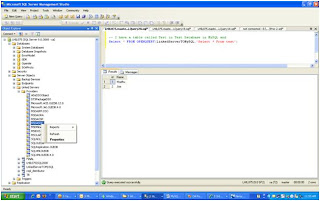
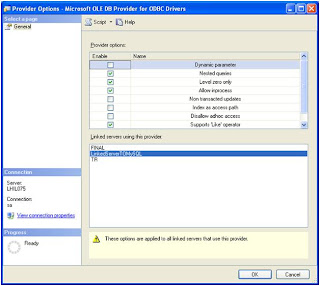
Step 3 : Create Linked Server in SQL Server 2005.

Change the properties of the Provider
Select the properties as shown in the screens


--======================================================================================================

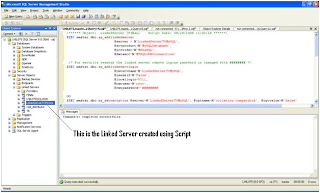
Script to Create Linked Server
It is always better to create linked server using Script than GUI. You have more control and script of course is more readable. I am not giving the screen shot for this steps. Copy paste the script to a query analyzer change DSN Name, Username, Password and run.

--======================================================================================================
/****** Object: LinkedServer [LinkedServerTOMySQL] Script Date: 08/28/2008 11:40:28 ******/
EXEC master.dbo.sp_addlinkedserver
@server = N'LinkedServerTOMySQL',
@srvproduct=N'MySQLDatabase',
@provider=N'MSDASQL',
@datasrc=N'MYSQLODBCConnection'

Parameter Explanation

@server = N'LinkedServerTOMySQL', -- Linked server name (it can be anything)
@srvproduct=N'MySQLDatabase', -- Keep as it is
@provider=N'MSDASQL', -- Keep as it is
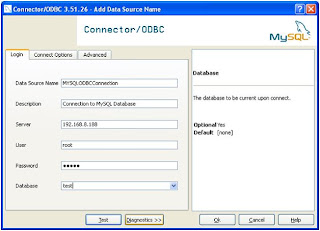
@datasrc=N'MYSQLODBCConnection' --DSN Name Created in Step 3 (very important)


/* For security reasons the linked server remote logins password is changed with ######## */
EXEC master.dbo.sp_addlinkedsrvlogin
@rmtsrvname=N'LinkedServerTOMySQL',
@useself=N'False',
@locallogin=NULL,
@rmtuser=N'root',
@rmtpassword='change thepasswordhere'

GO
EXEC master.dbo.sp_serveroption @server=N'LinkedServerTOMySQL', @optname=N'collation compatible', @optvalue=N'false'
GO
EXEC master.dbo.sp_serveroption @server=N'LinkedServerTOMySQL', @optname=N'data access', @optvalue=N'true'
GO
EXEC master.dbo.sp_serveroption @server=N'LinkedServerTOMySQL', @optname=N'dist', @optvalue=N'false'
GO
EXEC master.dbo.sp_serveroption @server=N'LinkedServerTOMySQL', @optname=N'pub', @optvalue=N'false'
GO
EXEC master.dbo.sp_serveroption @server=N'LinkedServerTOMySQL', @optname=N'rpc', @optvalue=N'false'
GO
EXEC master.dbo.sp_serveroption @server=N'LinkedServerTOMySQL', @optname=N'rpc out', @optvalue=N'false'
GO
EXEC master.dbo.sp_serveroption @server=N'LinkedServerTOMySQL', @optname=N'sub', @optvalue=N'false'
GO
EXEC master.dbo.sp_serveroption @server=N'LinkedServerTOMySQL', @optname=N'connect timeout', @optvalue=N'0'
GO
EXEC master.dbo.sp_serveroption @server=N'LinkedServerTOMySQL', @optname=N'collation name', @optvalue=null
GO
EXEC master.dbo.sp_serveroption @server=N'LinkedServerTOMySQL', @optname=N'lazy schema validation', @optvalue=N'false'
GO
EXEC master.dbo.sp_serveroption @server=N'LinkedServerTOMySQL', @optname=N'query timeout', @optvalue=N'0'
GO
EXEC master.dbo.sp_serveroption @server=N'LinkedServerTOMySQL', @optname=N'use remote collation', @optvalue=N'true'

--======================================================================================================

Enable Distributed Queries (OpenQuery) in SQL Instance
By default in SQL Server 2005 Distributed Queries are disabled. You have to enable it using the following script. (Note : In SQL Server 2000 no need to run this script)


Copy this script to a query analyzer and run
EXEC sys.sp_configure N'show advanced options', N'1' RECONFIGURE WITH OVERRIDE
EXEC sys.sp_configure N'Ad Hoc Distributed Queries', N'1'
RECONFIGURE WITH OVERRIDE


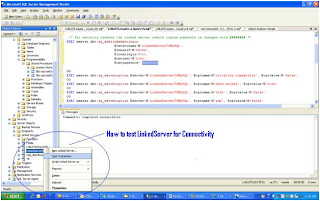
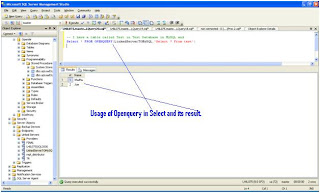
Finally, Test the Linked Server and Run a OpenQuer against the LinkedServer Configured


Check the following Screen


Restart Database Engine and SQL Server Agent

Once you have completed all the steps you may restart the services. I have not tested this whether you need to restart it or not


Summary :
If anyone feels some screen shots are missing please drop a comment.

Saturday, August 9, 2008

Creating Files from the images stored in Binary format in the database table.

Problem :-
Images are stored in a database table-Varbinary (SQL Server 2005) column. Form the stored images we need to create individual image files.

Solution :
BCP QUERYOUT with little format file tweaking can be a wonderful solution for this. You can include this BCP queryout in a XP_CMDShell dynamic sql from SQL Env and it will provide a simple solution to this complex requirement.


Demo environment details
Database : AdventureWorks
Table : ProductionPhoto
Image Column : LargePhoto
There are 101 rows in this table, each one having a LargePhoto column with some image. We need to create 101 JPG files from this table. Here we go…

Step 1 : Creation of Format File

C:\>bcp AdventureWorks.Production.ProductPhoto format nul -T -n -f c:\PP.fmt


Step 2 : Format file will looks something like this


Step 3 : Tweak Format file : We need to get the LargePhoto column binary data.

• Remove all column except LargePhoto
• Change Prefix of LargePhoto column from 8 to 0 (zero)
• Change Number of column from 6 to 1
• Change column sequence from 4 to 1
• After the ncessary modification the format file should look like next sceen


Step 4 : Use BCP QUERYOUT to create Image files

My BCP QUERYOUT query is this
--=====================================================================================
C:\>bcp "SELECT top 1 LargePhoto FROM AdventureWorks.Production.ProductPhoto wh
ere ProductPhotoID=69" queryout c:\ProductPhotoID_69.jpg -T -fC:\PP.fmt

Starting copy...

1 rows copied.
Network packet size (bytes): 4096
Clock Time (ms.) Total : 1 Average : (1000.00 rows per sec.)

C:\>
=====================================================================================


The above BCP Queryout statement is created a file ProductPhotoID_69.jpg . Now let us go and open that form windows


Double click the file and the file opened


Step 5 : Loop through all the records in this table and create respective files of each row in C:\Photo folder


--==============================================================================
SET NOCOUNT ON

DECLARE @ProductPhotoID int, @Sqlstmt varchar(4000),@LargePhotoFileName varchar(200)


DECLARE Cursor_ProductPhoto CURSOR FOR
SELECT ProductPhotoID, LargePhotoFileName
from AdventureWorks.Production.ProductPhoto
ORDER BY ProductPhotoID

OPEN Cursor_ProductPhoto

FETCH NEXT FROM Cursor_ProductPhoto
INTO @ProductPhotoID, @LargePhotoFileName

WHILE @@FETCH_STATUS = 0
BEGIN
PRINT @LargePhotoFileName


-- Framing DynamicSQL for XP_CMDshell


Set @Sqlstmt='bcp "SELECT top 1 LargePhoto FROM AdventureWorks.Production.ProductPhoto where ProductPhotoID='+str(@ProductPhotoID)+'" queryout c:\Photo\'+ltrim(@LargePhotoFileName)+' -T -fC:\PP.fmt'
print @sqlstmt
exec xp_cmdshell @sqlstmt
FETCH NEXT FROM Cursor_ProductPhoto
INTO @ProductPhotoID, @LargePhotoFileName
END
CLOSE Cursor_ProductPhoto
DEALLOCATE Cursor_ProductPhoto

--==============================================================================

Check this Screen. The above script has created individual files in this folder


Summary :-

This solution provides very simple method to create files from the binary stored in Database by little tweaking in Format file. If you want to keep a backup of Images in file system format then this method can really help.

Wednesday, August 6, 2008

Microsoft SQL Server 2008 Released

Finally Microsoft SQL Server 2008 RTM version is released today. It was suppose to release almost one year back but somehow did not. There are seven editions in SQL Server 2008.

In a press release, Microsoft cited several large enterprise customers who are testing SQL Server 2008, including Xerox, Siemens, Clear Channel Communications and Fidelity Investments.
 
Locations of visitors to this page